
A PRIMER ON MECHANICAL KEYBOARDS, FOR CASUALS, PART 2
The big list of buzzwords

Now that the terrible mistake of buying a mechanical keyboard has been committed to, we can look at how to minimize the damage caused by this decision. Value and return on investment are as important as keeping the total cost down, since some features become available with the addition of mere dollars.
The point of the below list of keyboard components is to give some idea about the minutia that are fussed over in purchasing a new keyboard. These terms are commonly seen on store pages, so are readily encountered when trying to make a purchase. If by some good fortune you notice a feature or piece of functionality in the below list that strikes your fancy, you can use that (combined with your budget) as the foundation for your research into a keyboard worth purchasing.
Overview:
Here are the key components of buying a keyboard. Each of these will affect price in some way, which will be mentioned in each section. The list will further be subdivided into sections covering three overarching categories; function, ergonomics, and aesthetics. Functional components affect the capabilities of the keyboard. Ergonomics affect the quality of the keyboard usage experience. Aesthetics have little to zero impact on the actual usage of the keyboard, but can affect the feeling of satisfaction from the purchase.
Impact on cost will be rated MINOR, MODERATE, or SUBSTANTIAL. These terms are deliberately vague and are intended as reference only.
This list is not in order of importance.
Function
Size/Layout
There are a number of layouts. Besides overall size and number of available keys, a nonstandard layout will limit your ability to find keycap sets which include keys with the right shape for your keyboard.
Fullsize keyboards have everything you would expect, including arrow keys, number pad, and home cluster. They are large, but if you need a number pad this is the most common option.
Tenkeyless (TKL, 80%, 87-key) keyboards are missing the number pad, but are otherwise standard layout. They are significantly more compact than a fullsize board.
75% keyboards are somewhat smaller than a TKL board, shrinking the right shift key and shrinking or deleting the right control/alt keys to squish the arrow key cluster into the alphanumeric section. The home cluster is abridged, and the keys that are retained depends on the board and the keycap set layout. The 75% keyboard commonly sports a knob.
65% keyboards remove the function row and further squish the arrow keys into the alphanumeric section.
60% keyboards are essentially just the alphanumeric section of a fullsize or TKL keyboard with the squiggly key replaced with the escape key. It has no home cluster or arrow keys.
Other layouts exist, like 40%, 96%, 1800, but these are somewhat niche and more importantly not available at a low cost.
Layout contributes a SUBSTANTIAL part to the price, although it is not merely that a larger keyboard is always more expensive. Scalability means that the most popular layouts can be had for a cheaper price even if they are a bit bigger. 75% keyboards have been the “in” thing for a while now.
If keycap compatibility is a priority, TKLs, fullsize, and 60% boards are the best in that order. While mostly identical, fullsizes have the disadvantage of the numpad which can be an optional add-on to sets. 60% boards replace the squiggly key with the escape key due to the deletion of the function row. I have a bias against 65% and 75% boards because they require extra non-standard keys to fill out.

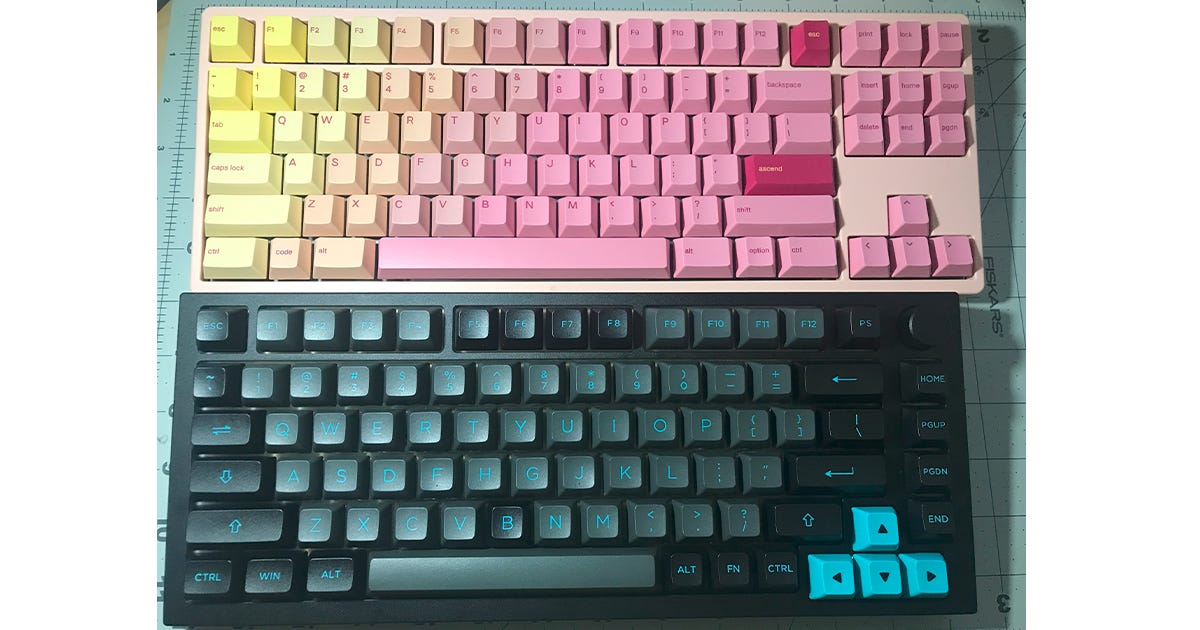
A TKL (above) and 75% (below) board. The similarity in size is due to camera angle, though I still don’t believe the size difference justifies the proprietary layout. Ergonomic layouts
Alice keyboards split the alphanumeric section down the middle and twist both halves at an angle so that the keys face outwards. Other keys, such as the home cluster, spacebar, etc, are arranged around the alphanumeric section. They are supposed to be more ergonomic.
Split keyboards split the board similar to an Alice layout, but can be moved around independently.
Ergonomic layouts have a SUBSTANTIAL cost impact, are less common, and require keycap sets with specific layouts to fill. Their ergonomic advantages depend on the individual.
Knob/Encoder
The technical term is encoder, though it looks and functions like a knob. Most knobs can be clicked down, and both the twisting motion and the click are programmable for functions like volume adjustment or zoom in / zoom out.
Knobs have a MODERATE impact on the price of the keyboard, but the availability of the knob tends to depend on the layout. 75% keyboards pretty consistently include knobs, and smaller layouts tend not to have them. You should consider getting a larger keyboard with a knob if you see a use for one.
Software
Software is a force-multiplier to the functionality of a keyboard.
QMK/VIA is a very commonly used software for keyboards. QMK is the programming, and VIA is a browser-based (and downloadable) application that allows users to customize keybinds, RGB lighting, additional macros (making one keypress do multiple functions or enable tools in applications like Photoshop), and additional programming layers. VIA has a visual representation of the keyboard being adjusted, making it easy to visualize what changes are being made. VIA saves automatically every time a change is made. Generally, VIA is preferred, as it has the most support and documentation.
Glorious Core is Glorious’ software. The user interface is, personally, harder to use. I’m unsure of how powerful the software is, and you need to save your progress every time a change is made.
Most PC peripheral companies have a unified software for their products, and their functionality, ease of use, and level of jank can vary.
Software has a MODERATE impact on price. Keyboards with VIA tend to be somewhat more expensive, as the cheaper generic brand keyboards come with proprietary software or no software at all. If you are serious about re-binding your keys or utilizing a lot of macros and fuction layers, VIA compatibility is a major feature to look for.
RGB Backlighting/Underglow
RGB backlighting can be useful to help the user see their keyboard lettering in low light conditions. Most keyboards come with a variety of lighting modes with shifting colors, and these are primarily used for merriment.
Underglow is less common and is more of an aesthetic addition.
RGB backlighting has a MINOR impact on cost. Although RGB backlighting does tangibly increase the cost of the keyboard, it is such a popular feature that even the cheapest mechanical keyboards come with some type of backlighting as standard. The variety of color patterns will depend on the software and can vary from keyboard to keyboard.
Wired/Wireless
This is self-explanatory, although there are two main forms of wireless connection. Wireless requires a USB dongle, while Bluetooth needs to pair with a Bluetooth capable device. Depending on the model, they are either installed with a rechargeable battery back or take regular alkaline battery. Wireless keyboards often also have a wired option.
Wired keyboards usually work as soon as you plug them in.
Wireless functionality plays a MODERATE part in raising a keyboard’s cost, though the cheapest keyboard with a hotswap PCB I am aware of is wireless only.
KIT VS COMPLETE BOARD
Keyboards nowadays can come pre-built, barebones, or as a kit.
Pre-built
Pre-built keyboards come preinstalled with switches and keycaps. These keyboards are usable straight out of the box, and the switches and keycaps can always be swapped out later. Pre-builts usually have a small number of switch options to choose from (usually generic brand or switches known to be “value offerings”), while the keycaps depend more on the selected color of the board.
Some pre-builts come with legitimate aftermarket switches and keycaps. These have a commensurate increase in cost, though they still tend to be slightly cheaper than buying all the parts separately.
Barebones
Barebones keyboards are fully assembled with the exception of keycaps and switches, which themselves are very easy to install. They usually cost a little less than prebuilts. These are popular with “enthusiasts” as this demographic already possesses quantities of switches and keycaps to fill out a new board, and those bundled with Pre-builts are often basic or boring.
Kits
Keyboard kits don’t come assembled, and require the end-user to assemble the keyboard themselves. This is not a particularly involved process at the most basic end (a couple screws) but can be more time-consuming if one decides to lube the stabilizers or add sound-dampening material. These are preferred by “enthusiasts” as this demographic often intends to immediately start modifying their keyboard and the kit arriving in parts removes the hassle of the initial disassembly. Kits are cheaper than the equivalent pre-built option, though as far as I’m aware no keyboard is offered both as a kit and as a barebones board.
The addition of switches and keycaps has a MODERATE impact on price. Getting a fully-functional keyboard for the addition of just $20 is a great deal, but if one intends on pulling those parts out anyway that $20 can be saved for something else.
Most mechanical keyboards (and practically all that should be considered by someone reading this article) use cherry MX-style switches. You can google these yourself, but the important thing is that most MX-style switches can be used in most boards. This means that almost every kit or barebones keyboard can be installed with almost every mx type switch, and almost every keycap set will be compatible with almost every switch. You shouldn’t choose a prebuilt for fear of not finding compatible switches, as everything is deliberately made to be cross-compatible.
Ergonomics
Case Material
Case material can affect the weight, shape, feel, and sound of the keyboard. Common types of case material include plastic, acrylic, and aluminum.
Case material has a SUBSTANTIAL impact on the cost of a keyboard. Expect to pay more for aluminum or acrylic.
Typing Angle (and adjustability)
Typing angle is a very subjective preference, although using a keyboard at an unfamiliar angle can be jarring. Most people are familiar with a typing angle of about 4 degrees, although flat keyboards on laptops have a large userrbase.
Some keyboards come with adjustable feet which allows the user to change the typing angle without using a stand.
Typing angle has a MINOR impact on cost. Typing angle is often based solely on the personal preference of the designer. Adjustable feet do require some work on the part of the designer to implement, though its component cost is likely negligible. That being said, adjustable feet are not often seen on metal bodies keyboards.
Mounting Style
Mounting style describes how the PCB and plate are connected to the case. This can affect typing feel, acoustics, and ease of disassembly.
Overly simplified, the goal of utilizing more involved mounting styles is to adjust the level of flex the plate/PCB and make the amount of support under each keypress more consistent. Both sound and flex are a matter of preference, though consistency between presses for both are universally preferable.
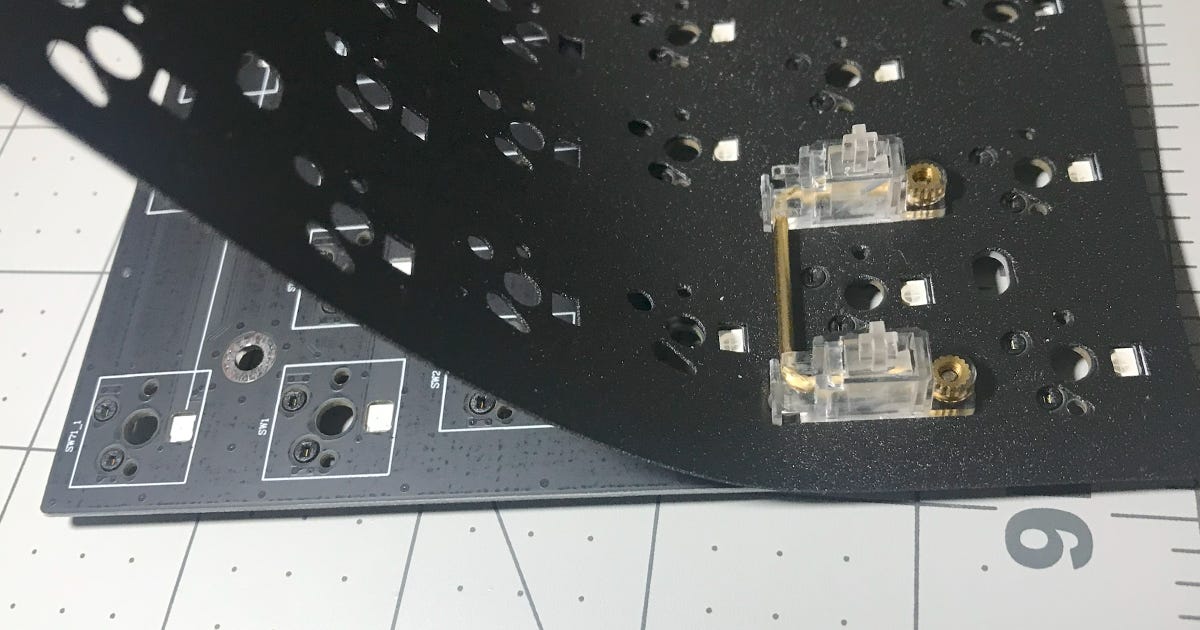
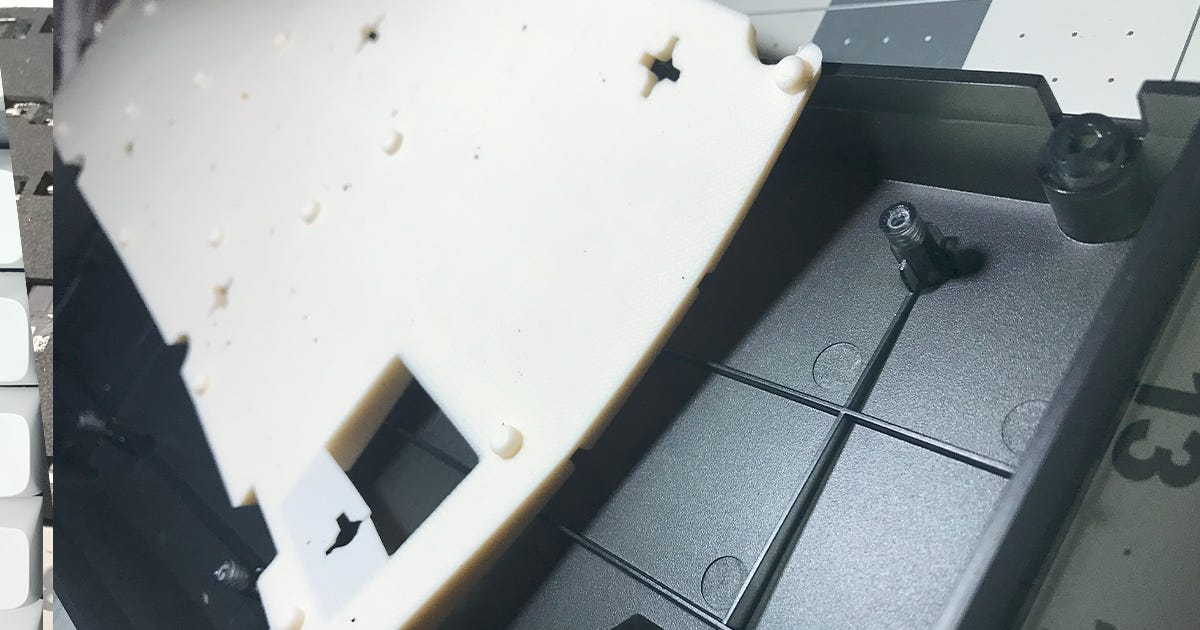
Tray Mount: The most common and least expensive mounting style. The Plate/PCB is mounted to the case by multiple extensions from the bottom of the case. There isn’t much flex as the plate is centrally supported by multiple extensions, and as the typing feel and sound (in a very minor and practically irrelevant way) can vary based on the pressed switch’s proximity to an extension. Plate material can add some flexy feel and change the acoustics to a small degree.
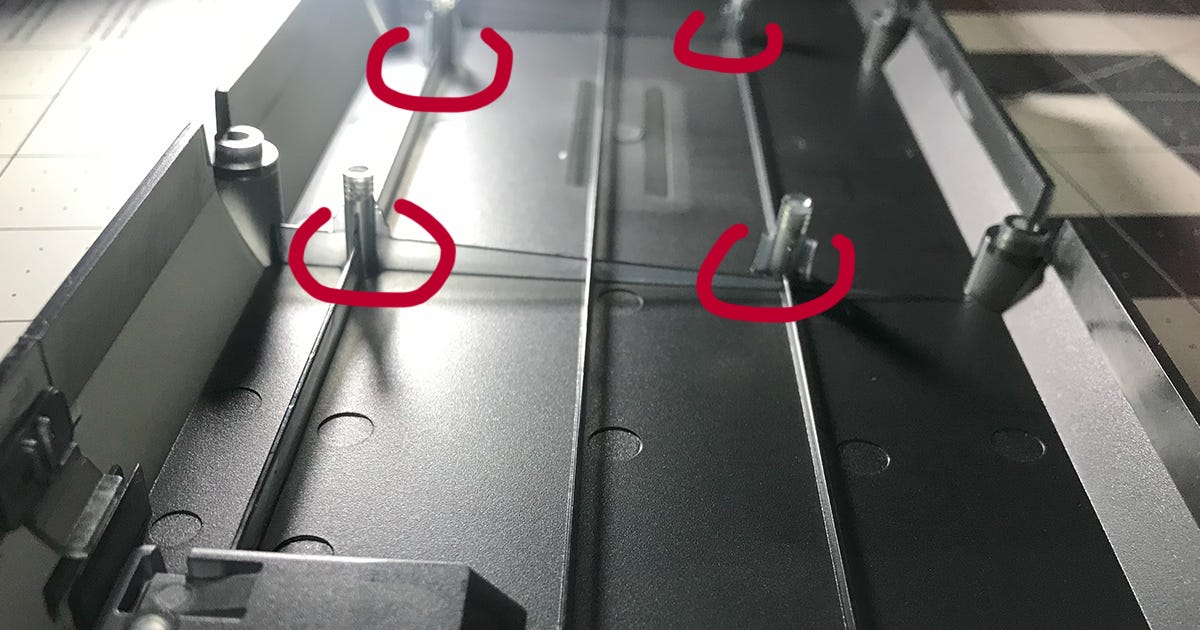
The bottom case extensions indicative of a tray mount. These extensions pass through holes in the PCB and are secured by screws to the bottom of the plate. Top Mount: The Plate/PCB is directly mounted to the top frame along the edges. There’s (allegedly) more of a consistent sound and flex than a tray mount, though it is less flexible than a gasket mount.
Gasket Mount: The Plate/PCB is suspended by one means or another along the walls of the top and bottom frame. In many cases, rubber or foam pads are placed over extensions on the plate, with the compression of these pads and the bending of the plate giving the gasket mount its notorious flex. The absolute quantity of flex depends on a number of factors, including but not limited to pad shape and material, plate shape and material, PCB thickness and material, flex cuts, etc.
There’s some discussion as to whether the original intent of gasket mounts was to induce flex or whether it was to provide more thorough sound isolation, but as of now it is a common expectation for gasket-mounted keyboards to flex.
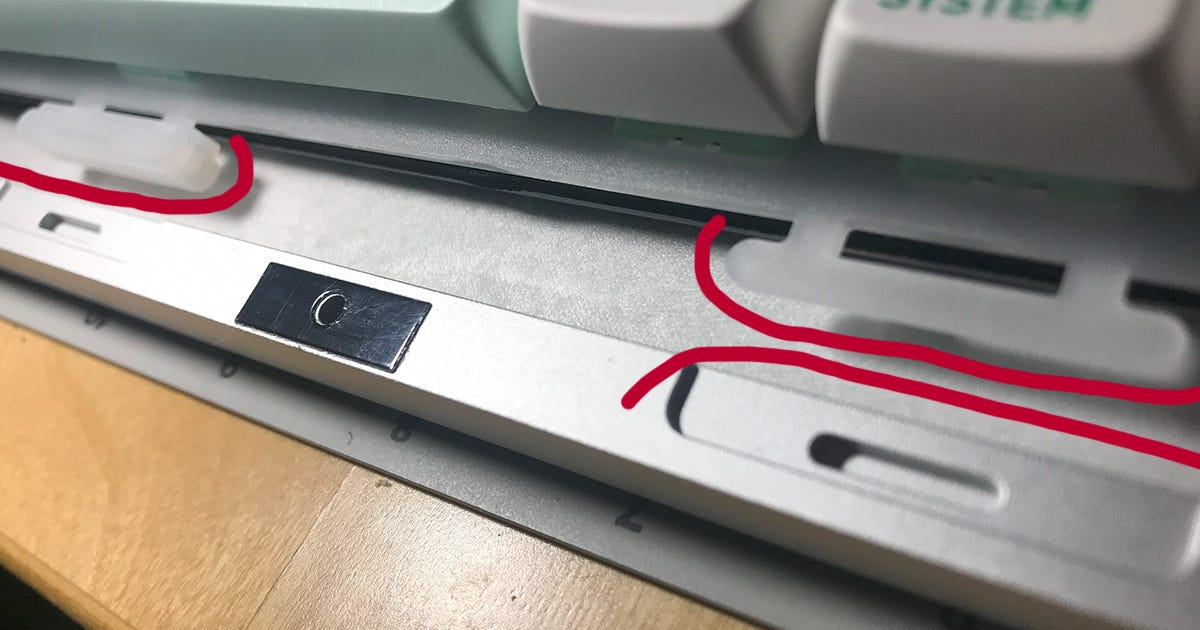
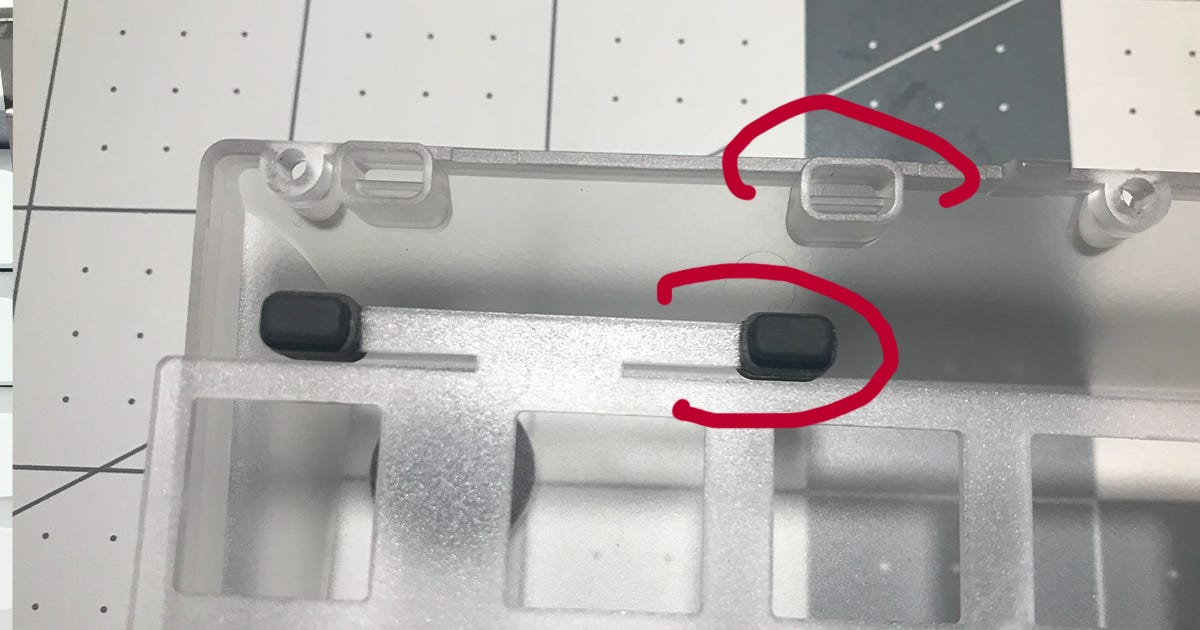
Sleeve type gasket mount. On the left is a silicon sleeve and on the right is what the plate extension looks like under the sleeve. Below is the cutout for the gasket sleeve. 
A sock type gasket mount. Of particular note are the thin tabs extending from the plate which the rubber socks sit on. 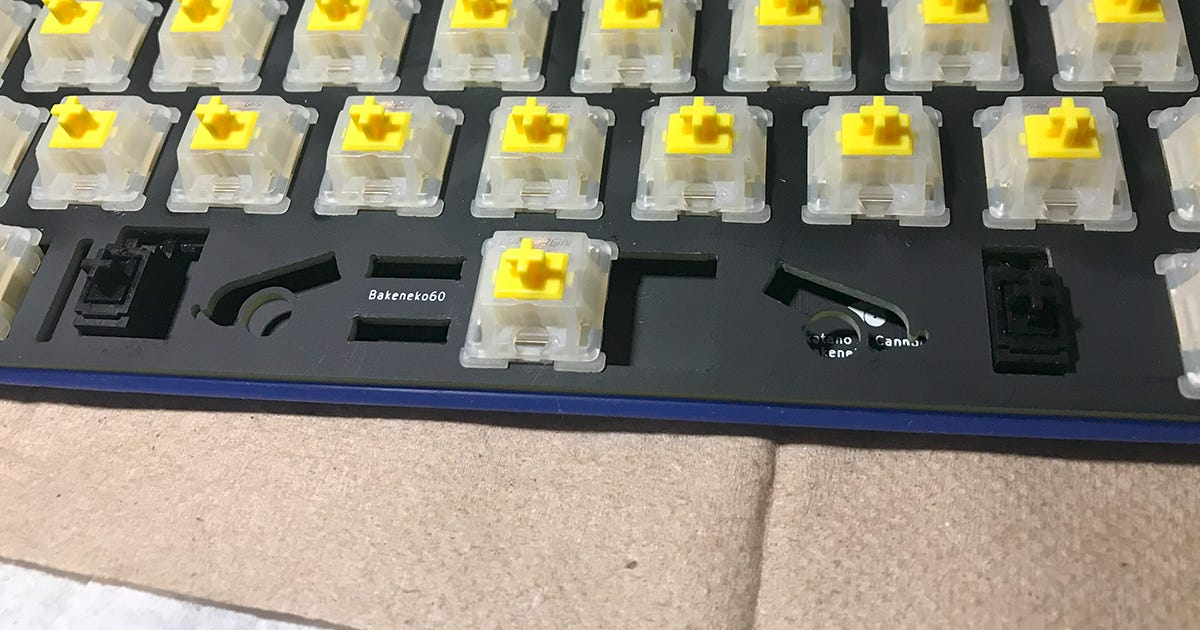
An O-ring gasket mount. Extensions from the bottom case hold the plate up by the O-ring. Others: Bottom mounts, plate mounts, burger mounts, etc, exist as more minor mounting styles. Most designs either go with a tray mount for cost or a gasket mount for the mass appeal of a flexy keyboard.
Mounting style can have a SUBSTANTIAL impact on the price of the keyboard, as certain mounting styles necessitate most of the keyboard being built around them. If you are willing to shell out money for a gasket mount or any of the more esoteric types of mounting style, expect to pay more or be limited in other ways. Most people inexperienced with keyboards will likely notice a good new switch far more than if there is a gasket mount under said switch.
Bottom Row
This is a small thing, though fullsize, TKL, and 60% keyboards are affected by this. There are a number of variations to the layout of the bottom row. The standard has a 6.25 unit long spacebar, with a Control, Windows, and Alt key to the left of the spacebar and a Control, Function, Menu, and Alt key to the right. A major alternate bottom row layout is the so-called “winkeyless” or Tsangan bottom row, with a 7 unit long spacebar, differently sized Control, Function, and Alt keys on the left of the spacebar, and differently sized Control, Function, and Alt keys to the right. I have no idea what the origin of this alternate “7u” layout is, though it seems to have popularity in some circles for aesthetic reasons. The practical impact of this bottom row layout is that many keycap sets become incompatible with this keyboard, or require optional expansion sets to become compatible. For this reason I would recommend avoiding 7u bottom rows where possible, though outside of keycap compatibility there is little difference in actual functionality.
Bottom row differences have a MINOR impact on the end cost of keyboards.
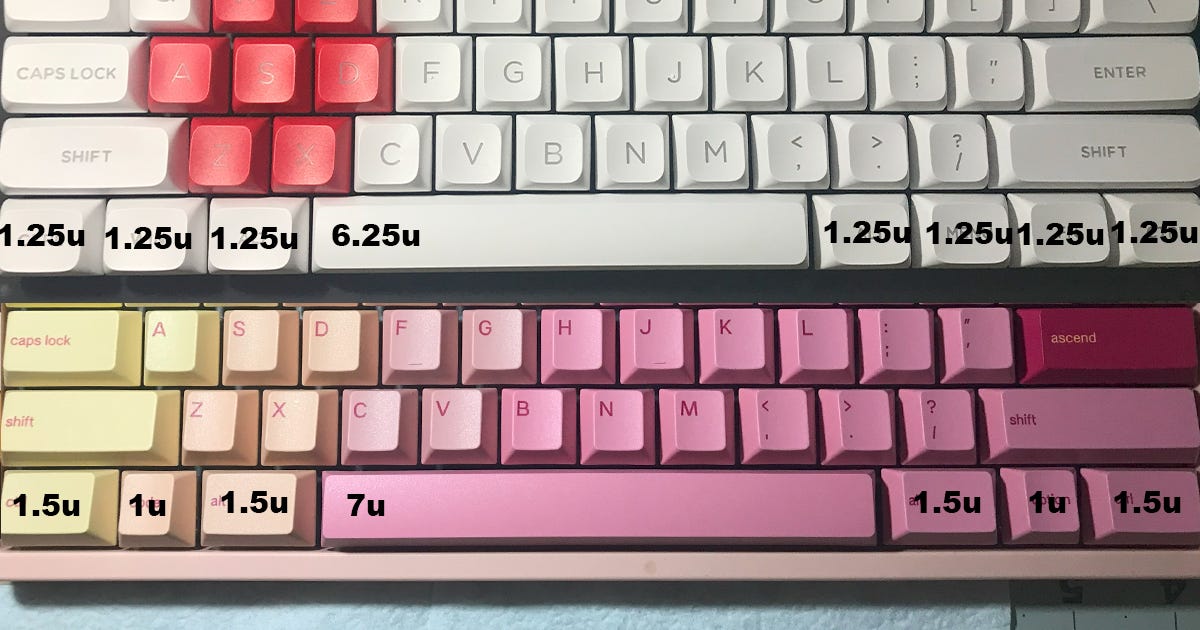
A standard layout (above) and a “Tsangan” 7u layout (below). Note the complete incompatibility of the two bottom rows. Plate Material
Plates are what switches secure into, and when one puts pressure on a keyboard they are putting pressure on the plate. As such, different plate materials impact the sound, feel, and flex of a keyboard. How different plate materials change these aspects depends on the keyboard itself, as how the plates are secured to the case is a significant contributor to them as well.
Below is a list of some plate materials from stiffest to flexiest. This is generally speaking, so consult reviews for individual products for more details.
Brass: Usually aftermarket.
Steel: Standard on Keychron V series boards.
Aluminum: Standard on many gasket-mount keyboards.
FR4 Fiberglass: Usually aftermarket.
Acrylic/POM: These are different materials but I don’t know how exactly they compare. They seem to be quite similar and available aftermarket in various colors.
PC (Polycarbonate): Often standard on gasket-mount keyboards.
Especially colorful plates can show through the cracks between keycaps, and clear or transparent plates can help express a keyboard’s RGB or backlighting.
Plate material has a MINOR impact on cost.
Stabilizer Type
Stabilizers function as their name would imply, keeping longer keys like Enter, Shift, and the Spacebar from bending when pressed on the edge. There are a number of types of stabilizer, though their implementation depends on the design of the board. A good stabilizer design and implementation mitigates rattle, something universally thought to be unpleasant in keyboards.
Plate-mount stabilizers are easy to install and remove, but can have major tolerance issues if they fit too loosely into the plate. These are not preferable in most situations.
Clip-in stabilizers are pressed into a hole in the PCB to secure. They seem to be used when space is at a premium on the keyboard, though the clips are less secure and can become loose when repeatedly installing and uninstalling them. They can also accidentally be pulled loose when removing keycaps.
Screw-in stabilizers are pressed into a hole in the PCB and secured by a screw on the otherside. These are durable, secure, and come in the largest variety of aftermarket options.
Stabilizer type has a MINOR impact on price, although the utilization of standard screw-in stabilizers on a keyboard is a good indication that the manufacturer is serious about their product.
It is important to note that the type of stabilizer used is not a complete indicator of the quality of a stabilizer, as the design and lubrication applied also play a large part.
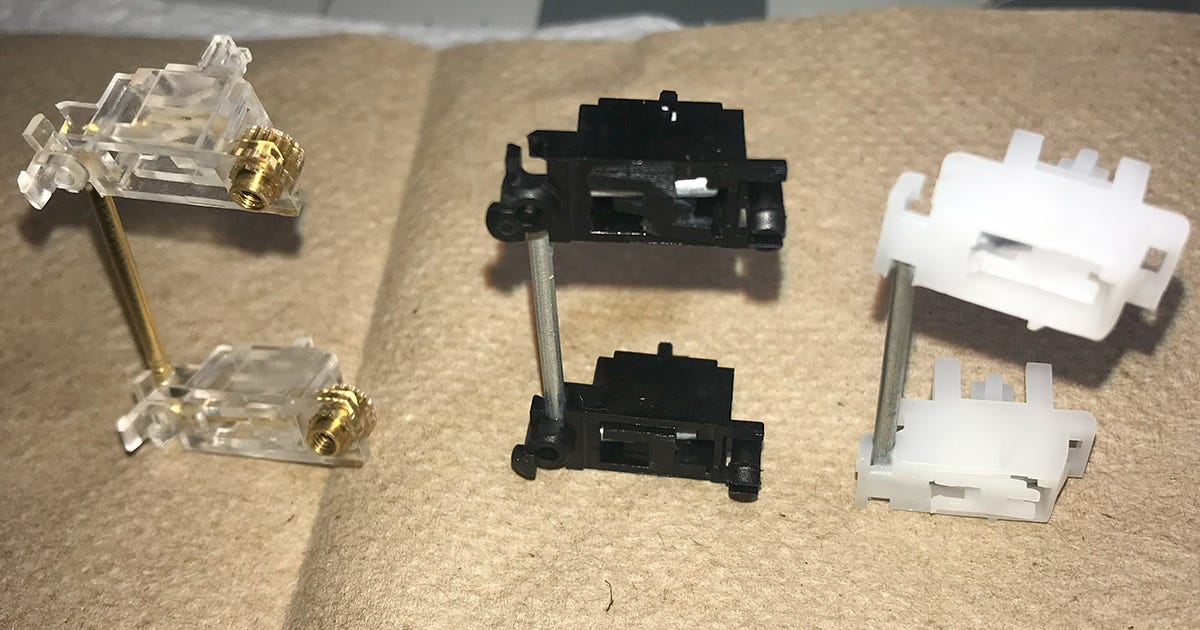
Screw-in (left), clip-in (middle) and plate-mount (right) stabilizers. Weight
Weight depends primarily on the case material and layout. Aluminum or other metals will always be heavier than plastic, and a fullsize keyboard will always be heavier than a 60% keyboard of equivalent case material. In many fancy models, optional weights are installed for both visual appeal and acoustic tuning.
Weight has a MINOR impact on price, and largely depends on other factors.
Disassembly process
Most keyboards are assembled with a dozen or more screws, though the exact count can vary significantly by design. The total number of screws can significantly increase the hassle of maintenance or customization.
Separating the top and bottom case can take somewhere between 4 and 12 screws.
Tray-mount keyboards have their PCB secured to the bottom case extensions. this can be 4-6 screws.
Top-mounted keyboards have their PCB secured to the top case by 8-12 screws.
Plates can be secured to their PCB by 4-6 screws.
In most keyboards with 5 stabilized keys, these are secured with a total of 10 screws.
In cases with daughterboards, these can be secured with 1-4 screws and be connected to the main PCB with a cable that must be unplugged during disassembly.
Disassembly has a MINOR impact on cost, as most designs aren’t really made with the ease or difficulty of disassembly in mind. That being said, some keyboards have absolutely obtuse disassembly processes that make end-user maintenance and modification a pain. Although not a major factor, ease of disassembly should be a consideration if one intends to get into keyboards as a hobby, or prefers to tinker.
Flex Cuts
Flex cuts are gaps in the PCB cut out to make it flex more. These gaps can also impact the sound and the typing feel, but to be able to confirm how exactly they change the feel one would have to buy multiple PCBs with different quantities and placements of flex-cut to see exactly how they differ.
Flex cuts have a MODERATE impact on the cost, and tend to be available in more expensive boards. In any case, it’s a side-grade.
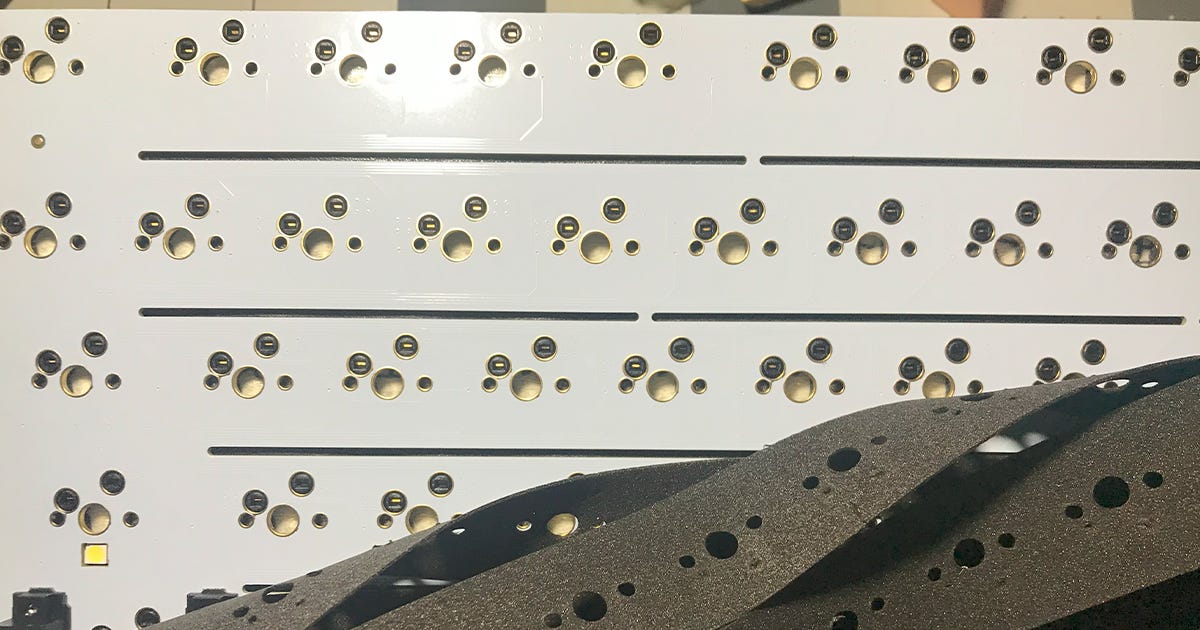
PCB flex cuts. There are examples of significantly fancier flex cuts out in the wild. Plate thickness
As far as I’m aware, the two most common plate thicknesses are 1.6mm and 1.2mm, with the thinner one being flexier. 1.6mm is the “default” option, and if a keyboard has a 1.2mm PCB it will require either specific stabilizers or some form of spacer. The thinner PCB has no impact on switch compatiblity.
Plate thickness has a MINOR impact on cost. Though choosing a non-standard thickness is a deliberate design choice, it’s not really a primary factor in selecting a keyboard.
Hotswap Socket
Hotswap sockets are what the metal contacts in the switch connect to. They’re called hotswap sockets because switches can be plugged in and out even while they keyboard is in use (this should be done with caution as voilently jamming a switch in may detach the socket and require soldering to repair). Although switches can be soldered manually and this provides a number of benefits, hotswap sockets offer a degree of accessibility that makes them essential to a new keyboard user.
There are two major types or hotswap sockets, which can be a source of concern for an inexperienced consumer.
Kailh/Gateron sockets: These are the standard. They are compatible with everything and are the preferred option.
Outemu sockets: These are only found on very cheap hotswap boards. They are functionally identical, but have smaller socket dimensions which don’t fit the contacts on most switches. Outemu and Akko switches have contacts that are thin enough to fit properly in these sockets, but you will be limited to these brands. Although Akko makes soem decent switches, this is a major limitation.
Socket type has a MINOR impact on cost, and it’s easy to find even cheap keyboards with the proper Kailh/Gateron style sockets.
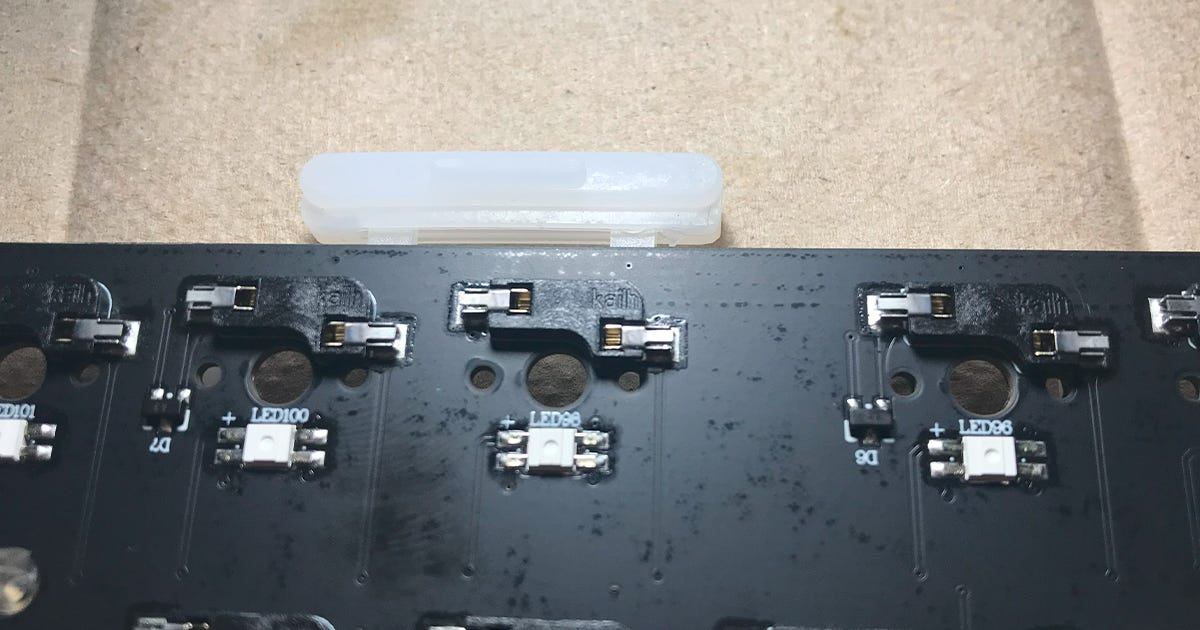
A standard Kailh hotswap socket. Note the LEDs below the switch holes. The metal contacts inside the hotswap sockets can become bent out of shape by especially thick and turgid switch contacts, requiring tweezers to be bent back into functional shape. Daughterboard
Daughterboards are secondary PCBs that house the USB socket. They are often utilized in gasket-mount keyboards so that there doesn’t need to be a wide hole sticking out of the side of the keyboard to accomodate the USB plug of a flexing PCB. They make disassembly slightly more involved and can be a cause for parts breakage if one inadvertantly tries to yank their PCB out while its still connected to the daughterboard, but are otherwise unimportant.
Daughterboards have a MINOR impact on cost, and only come up when part of the design.
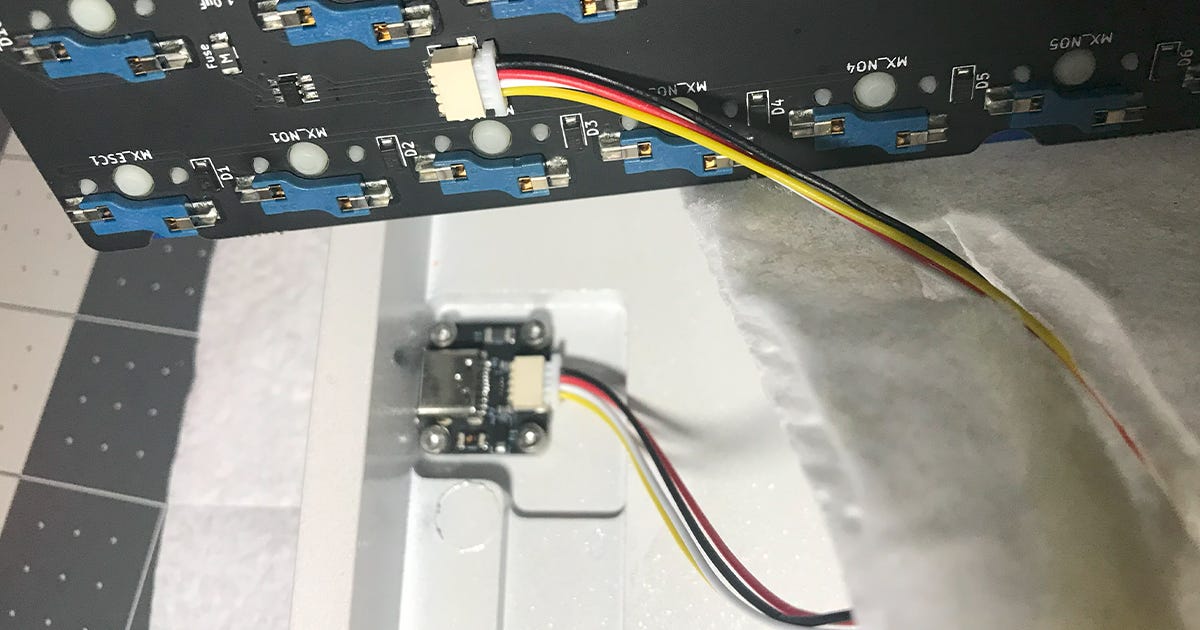
A daughterboard connected by JST cable. Note the four screws used to secure the daughterboard on this example. RGB Facing
Switches can either be north-facing (light at the top end of the switch) or south-facing (light at the bottom end of the switch). North-facing RGB is good for shinethrough keycaps where the letters are near-universally on the upper part of the keycap. South-facing is the choice of the “enthusiast”, as it makes the glow between keycaps more prominent.
One major issue with north-facing switches is that they can scrape against Cherry profile keycaps when typing. Cherry profile keycaps seem to have internal dimensions that are just tight enough to bump into the top housing of some switches when they are north-facing, which is why mostg north-facing keyboards come with OEM profile keycaps instead (They’re just slightly taller Cherry). This bumping feel is somewhat unpleasant, but can be bypassed with certain switches like the newer Kailh Box switches like Creams or Jellyfish, which are cut down on both the north and south side of the top housing. One can also just use other profile keycaps.
LED facing has a MODERATE impact on cost. Though no more inherently expensive than north-facing, south-facing keyboards tend to be more up-market with a commensurate increase in price.
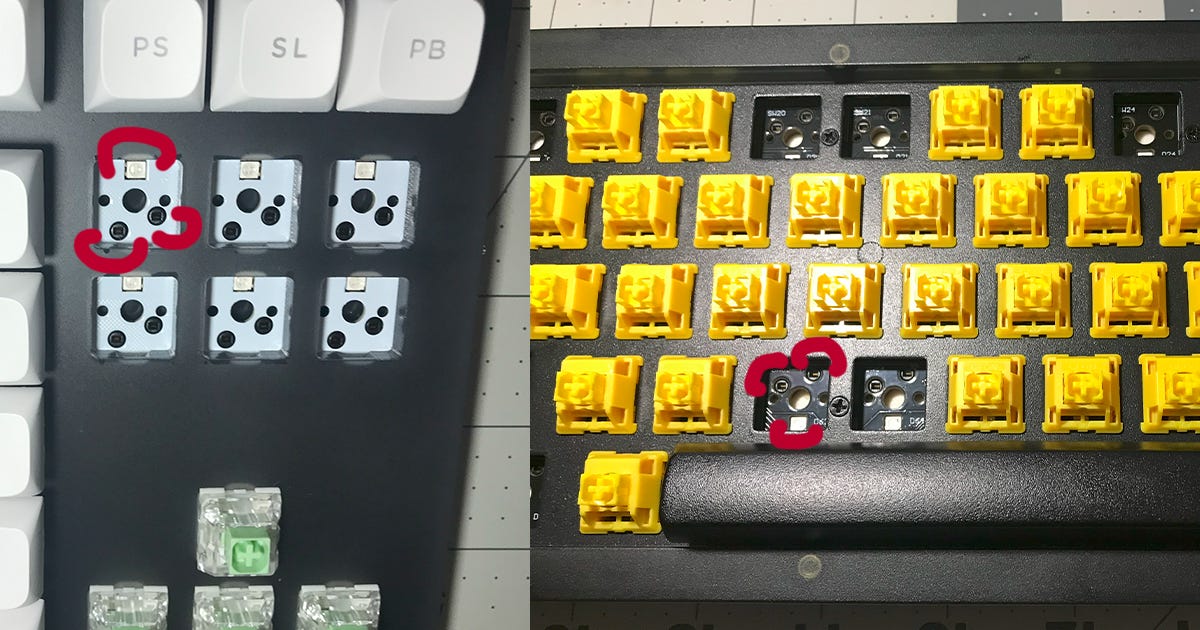
North-facing (left) and south-facing (right). The facing can be identified by the orientation of the LED or the hotswap socket. When switches are installed, the side of the switch with a clear flat window or cutout is the side with the LED underneath. Foam/Dampening material
Some keyboards come with foam and other dampening material either bundled along or installed within the keyboard. These change the sound of typing, and their use is usually up to personal preference.
The Monsgeek M3 has a 1.2mm PCB and a dampening Switch Pad which fits between the PCB and the switches and provides approximately 0.4mm of thickness. The included stabilizers are made for a 1.6mm pcb, and so only fit properly with the Switch Pad instralled. This is not common, and most dampening materials are not structurally necessary.
Examples of dampening material include:
Plate Foam: Fits between the PCB and Plate. Can interfere with RGB lighting.
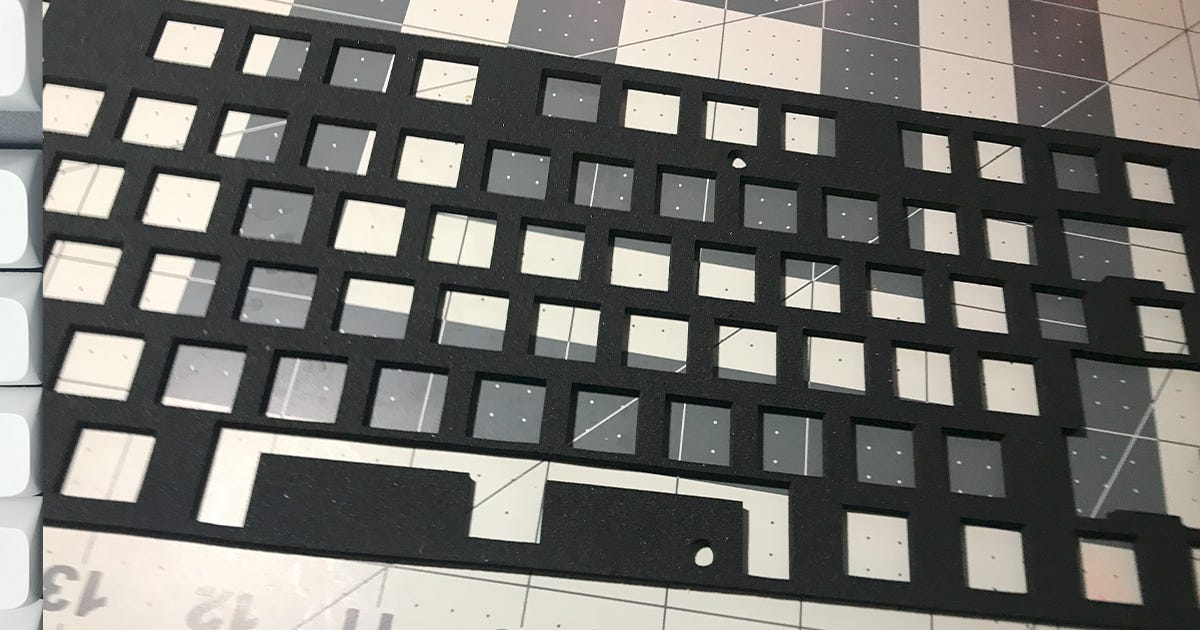
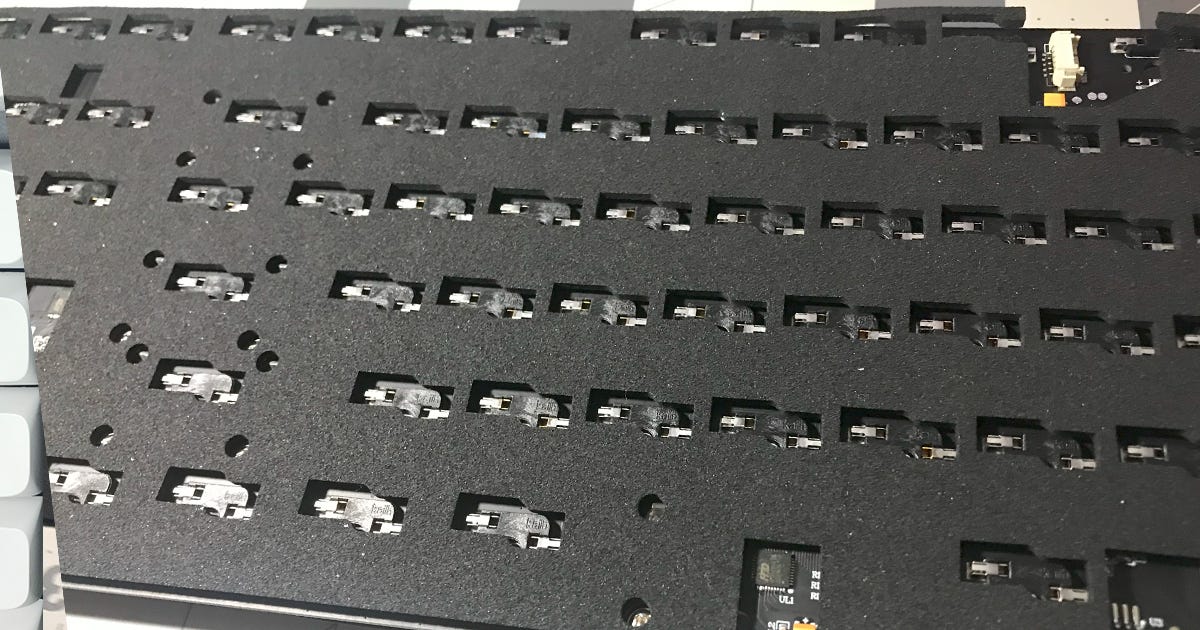
Plate foam. Switch Pads: Fit between the PCB and Switches. Can have cutouts for RGBs.
A switch pad. These usually need to be placed under the stabilizers and can make assembly more complicated. PCB Foam: layer of foam under the PCB. Often has cutouts for hotswap sockets, can interfere with gasket-mount flex.

PCB foam is usually secured using a “Tape Mod” (not pictured). “Tape Mod”: Essentially a PCB-sized sticker applied to the back, can be applied over PCB foam. Can interfere with RGB underglow and can come in interesting designs.
Case foam/dampening material: Material under the PCB and inside the case. Can interfere with underglow.
Silicone dampening material for a tray mount bottom case. Note the cutouts for the extensions. Foam/Dampening material has a MODERATE impact on cost. This is usually considered a premium feature.
Included Tools
The tools included with a keyboard depend on how much disassembly the manufacturer intends the keyboard to go through. Most moderate cost keyboards will come with the tools required to fully disassemble the keyboard, including keycaps and switches, though a Phillips Head screwdriver is occasionally omitted due to its ubiquity in the common household. The quality of the tool can vary, though they usually funtion as intended.
Keycap pullers can be cheap plastic rings or metal wire-pullers.
Switch pullers can be a thin metal claw or a tweezer type tool with silicon handle.
Hex or Torx screwdrivers are usually tiny pieces with small plastic handles.
Tools can have a MINOR impact on cost. It’s nice when they’re well-made, but it’s no major loss when they’re cheap little bits. If one intends on seriously tinkering with keyboards they should be looking into their own set of tools anyway.
Spare parts
Extra screws or rubber feet are common inclusions in more expensive kits. They have a MINOR impact on cost.


Aesthetics
Shape
Keyboards can vary in shape and design even within the same layout, largely decided either by manufacturing consideations or the aesthetic preferences of the designer. If you tend to move your keyboard around and are looking at aluminum-bodied keyboards, it might be important to consider where you can grip the board to pick it up. A completely slab-sided aluminum keyboard that weighs a few pounds will be a hassle to move around.
Shape can have a SIGNIFICANT impact on the cost of the keyboard.
Cable
Most keyboards and kits come with a USB-C to USB-A cable. While there are a variety of colors available as aftermarket options, most keyboards come with a plain black or white cable. The quality of finish varies, but they usually function comparably.
Techflex is a type of outer coating for cables consisting of an interwoven sleeve of plastic wire wrapped around the cable. It supposedly helps prevent the cable getting tangled, and in my opinion it has a pleasant feel and adds a depth of color to the cable it is applied on. Cables with Techflex are marginally more expensive, but some of the cables included with keyboards I have purchased came with Techflex.
Coiled cables are an aesthetic throwback to keyboards from the previous millennium. The coil serves little practical purpose other than to look nice on the desk.
Aviator cables are a “premium” option which is purchased entirely for aesthetic value. They consist of a coiled section and a straight section connected by a five-pronged “aviator” plug. They are usually wrapped in Techflex, and cost somewhere around $50. They function as normal USB cables.
You shouldn’t be deciding on your keyboard based on the look of the included cable. They have a MINOR impact on cost, although keyboards that would bother to include a premium aviator-style cable would likely be more expensive.
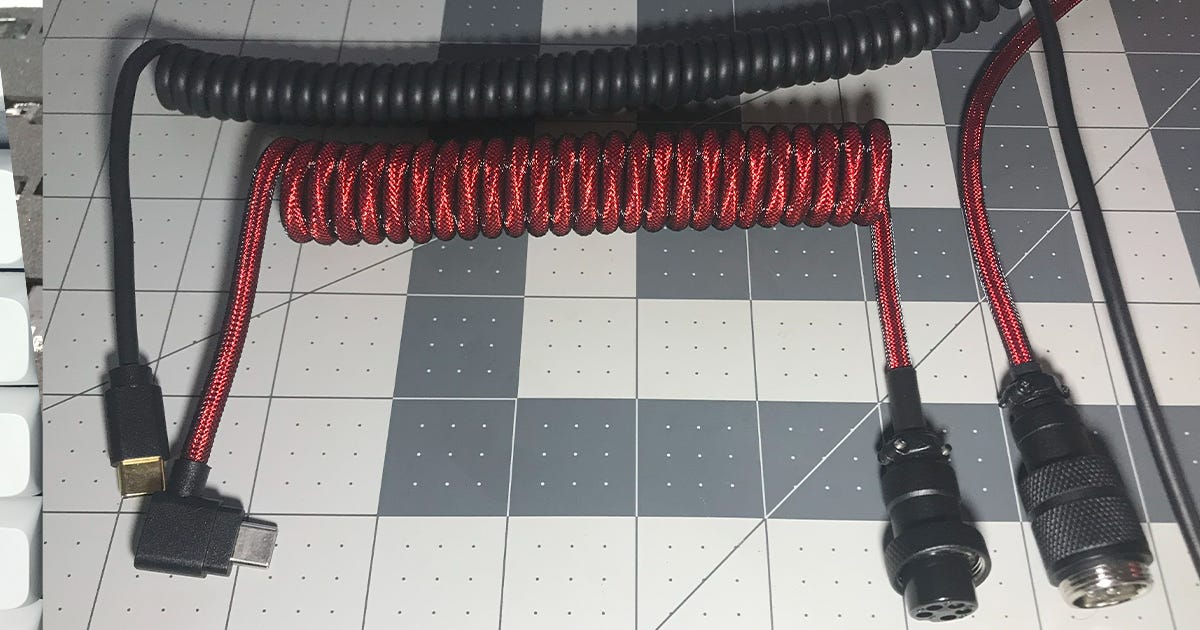
A rubber-coated coiled cable (above) and a braided Aviator cable with Techflex and a coil. Detached Aviator plug visible (bottom right). Note the light bouncing off each individual strand of Techflex. Although functionally pointless, it does look quite nice. Color/coating
Colors are a large part of the aesthetic appeal of custom keyboards. However, a large number of color variations can complicate the production of a board, and as such there are often limited color options in lower end boards.
Plastic or acrylic keyboards often have a limited number of colors, as adding another color option requires a whole new formulation of plastic to be developed, tested, production line established, etc.
Metal keyboards often have a wide range of color options, as the color is added either by paint, anodizing and sandblasting, or some other type of coating being applied to the same bare metal. Special coatings with special colors or finishes can often be acquired for an additional cost, and the metal case can be re-finished by a determined end-user with a lot of time on their hands.
Colors and coatings have a MINOR impact on cost. That being said, more expensive keyboards tend to have more color options.

Summary
Now that the basic features have been covered, you can start to form an idea about what you want to have in your keyboard. In practical terms, most of the features are not especially important, but some may catch your eye and be a way to orient your search for a mechanical keyboard you would be willing to purchase. Some can also be an indicator of the relative quality of a keyboard, with things like screw-in stabilizers and VIA compatibility being an encouraging sign in a lower-end product.
The above list can be used to compare features between keyboards to get a good sense of what is being offered. Some examples will be discussed in the next part.
In part 3, I will go over different keyboards that are available and how the features I listed here come together into a complete product. None of these will have affiliate links, and I hope you don’t misconstrue the article as an encouragement to buy anything.